
Serve a Python Function using Triton
This section will guide you through serving a plain Python function using the Triton Inference Server and Kale.
Overview
What You’ll Need
- An Arrikto EKF or MiniKF deployment with the default Kale Docker image.
- An understanding of how the Kale serve API works.
Procedure
This guide comprises three sections: In the first section, you will create a Python function and wrap it in way that you can use it with the Triton Inference Server. In the second section, you will leverage the Kale SDK to create an InferenceService using the Python function you created and the Triton backend. Finally, in the third section, you will invoke the model service to get back a prediction.
Create a Triton Inference Server Python Backend
This section will guide you through creating a Python function that performs a linear transformation on a given input. The function will be wrapped in a way that you can use it with the Triton Inference Server.
Create a new notebook server using the default Kale Docker image. The image will have the following naming scheme:
gcr.io/arrikto/jupyter-kale-py38:<IMAGE_TAG>Note
The
<IMAGE_TAG>varies based on the MiniKF or Arrikto EKF release.Connect to the notebook server, open a terminal, and create a new folder. Name it
linearand navigate to it:$ mkdir linear && cd linearCreate a file to place the configuration of your Python backend:
$ touch config.pbtxtCopy and paste the following text inside the
config.pbtxtfile:name: "linear" backend: "python" input [{ name: "INPUT" data_type: TYPE_FP32 dims: [ 4 ] }] output [{ name: "OUTPUT" data_type: TYPE_FP32 dims: [ 4 ] }] instance_group [{ kind: KIND_CPU }]This configuration file defines the name of the model, the backend that will be used to serve it, the input and output data types, and the instance group that will be used to serve the model.
You can see that the model expects a 4-dimensional input and returns a 4-dimensional output. The input and output data types are
TYPE_FP32, which means that the model expects and returns 32-bit floating point numbers. The instance group is set toKIND_CPU, which means that the model will be served using a CPU instance.For more information on the configuration file, see the Triton Inference Server config documentation.
Important
The name of the model should match the name of the folder that contains the configuration file. In this case, the name of the model is
linear, just like the name of the parent directory.Create a new folder to place the Python backend code:
$ mkdir 1 && cd 1Important
The name of the folder should match the version of the model. In this case, the version is
1. To learn more about the structure of a Triton model repository, see the Triton Inference Server model repository documentation.Create a file to place the Python backend code:
$ touch model.pyCopy and paste the following code inside the
model.pyfile:triton_python_function.py
1 # Copyright © 2022 Arrikto Inc. All Rights Reserved. 2 3 """Triton Python model. 4 5 This script defines a Triton Python model that can be used to serve a 6 simple Python function using the Triton Inference Server. 7 """ 8 9 import json 10 11 import triton_python_backend_utils as pb_utils 12 13 14 class TritonPythonModel: 15 """A Triton Python function backend.""" 16 17 def initialize(self, args): 18 """Intialize any state associated with this model.""" 19 self.model_config = model_config = json.loads(args['model_config']) 20 21 # Get OUTPUT configuration 22 output_config = pb_utils.get_output_config_by_name( 23 model_config, "OUTPUT") 24 25 # Convert Triton types to numpy types 26 self.output_dtype = pb_utils.triton_string_to_numpy( 27 output_config['data_type']) 28 29 def execute(self, requests): 30 """Execute the function.""" 31 output_dtype = self.output_dtype 32 33 responses = [] 34 for request in requests: 35 input = pb_utils.get_input_tensor_by_name(request, "INPUT") 36 37 out = 2 * input.as_numpy() + 1 38 out_tensor = pb_utils.Tensor("OUTPUT", 39 out.astype(output_dtype)) 40 41 inference_response = pb_utils.InferenceResponse( 42 output_tensors=[out_tensor]) 43 responses.append(inference_response) 44 45 return responses Note
Head over to the Triton Python backend documentation for more information on writing your Python backend.
Upload the
linearfolder to S3. You can complete this step manually or by using theawsCLI:$ aws s3 cp cifar10 s3://<bucket-name>/linear --recursiveNote
You can use almost any object storage provider, such as AWS S3, Azure Blob Storage, or Google Cloud Storage. For a list of the KServe supported services and their configuration, see the KServe documentation.
Retrieve the S3 URI pointing to your
linearfolder from the S3 UI. For examples3://<bucket-name>/.Important
You should provide a URI pointing but not including the
linearfolder. In this case, if your URI iss3://<bucket-name>/linear, you should provides3://<bucket-name>/.
Serve a Python function with Triton
This section will guide you through creating an InferenceService using the Triton backend and the Python function you created in the previous section and uploaded to S3.
In a new terminal window, create a new file named
s3-creds.yaml:$ touch s3-creds.yamlCopy and paste the following code into the
s3-creds.yamlfile:apiVersion: v1 kind: Secret metadata: name: s3-creds annotations: serving.kserve.io/s3-endpoint: s3.amazonaws.com serving.kserve.io/s3-region: <REGION> serving.kserve.io/s3-useanoncredential: "false" serving.kserve.io/s3-usehttps: "1" type: Opaque data: AWS_ACCESS_KEY_ID: <AWS-ACCESS-KEY-ID> AWS_SECRET_ACCESS_KEY: <AWS-SECRET-ACCESS-KEY>Replace the
<REGION>,<AWS-ACCESS-KEY-ID, and<AWS-SECRET-ACCESS-KEY>placeholders with your credentials. KServe reads the secret annotations to inject the S3 environment variables on the storage initializer or model agent to download the models from S3 storage.Create a new file for your
ServiceAccountresource:$ touch kserve-sa.yamlCopy and paste the following code into the
kserve-sa.yamlfile:apiVersion: v1 kind: ServiceAccount metadata: name: kserve-sa secrets: - name: s3-credsApply the
Secretand theServiceAccountresources:$ kubectl apply -f s3-creds.yaml && kubectl apply -f kserve-sa.yamlNote
If you are using a different object storage provider read the KServe documentation to configure your environment:
Create a new Jupyter notebook (that is, an IPYNB file):
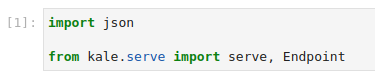
Copy and paste the import statements in the next code cell, and run it:
This is how your notebook cell will look like:
Instruct Kale to serve the model using the S3 URI you retrieved in a previous step. Copy and paste the following code in the next code cell, and run it:
config = {"protocol_version": "v2", "predictor": {"service_account_name": "kserve-sa", "storage_uri": "s3://arrikto-docs-kale-serve/triton/", "model_format": {"name": "triton"}}} isvc = serve(name="linear", serve_config=config)This is how your notebook cell will look like:

Get Predictions
In this section, you will query the model endpoint to get predictions.
Navigate to the Models UI to retrieve the name of the
InferenceService. In this example, it islinear.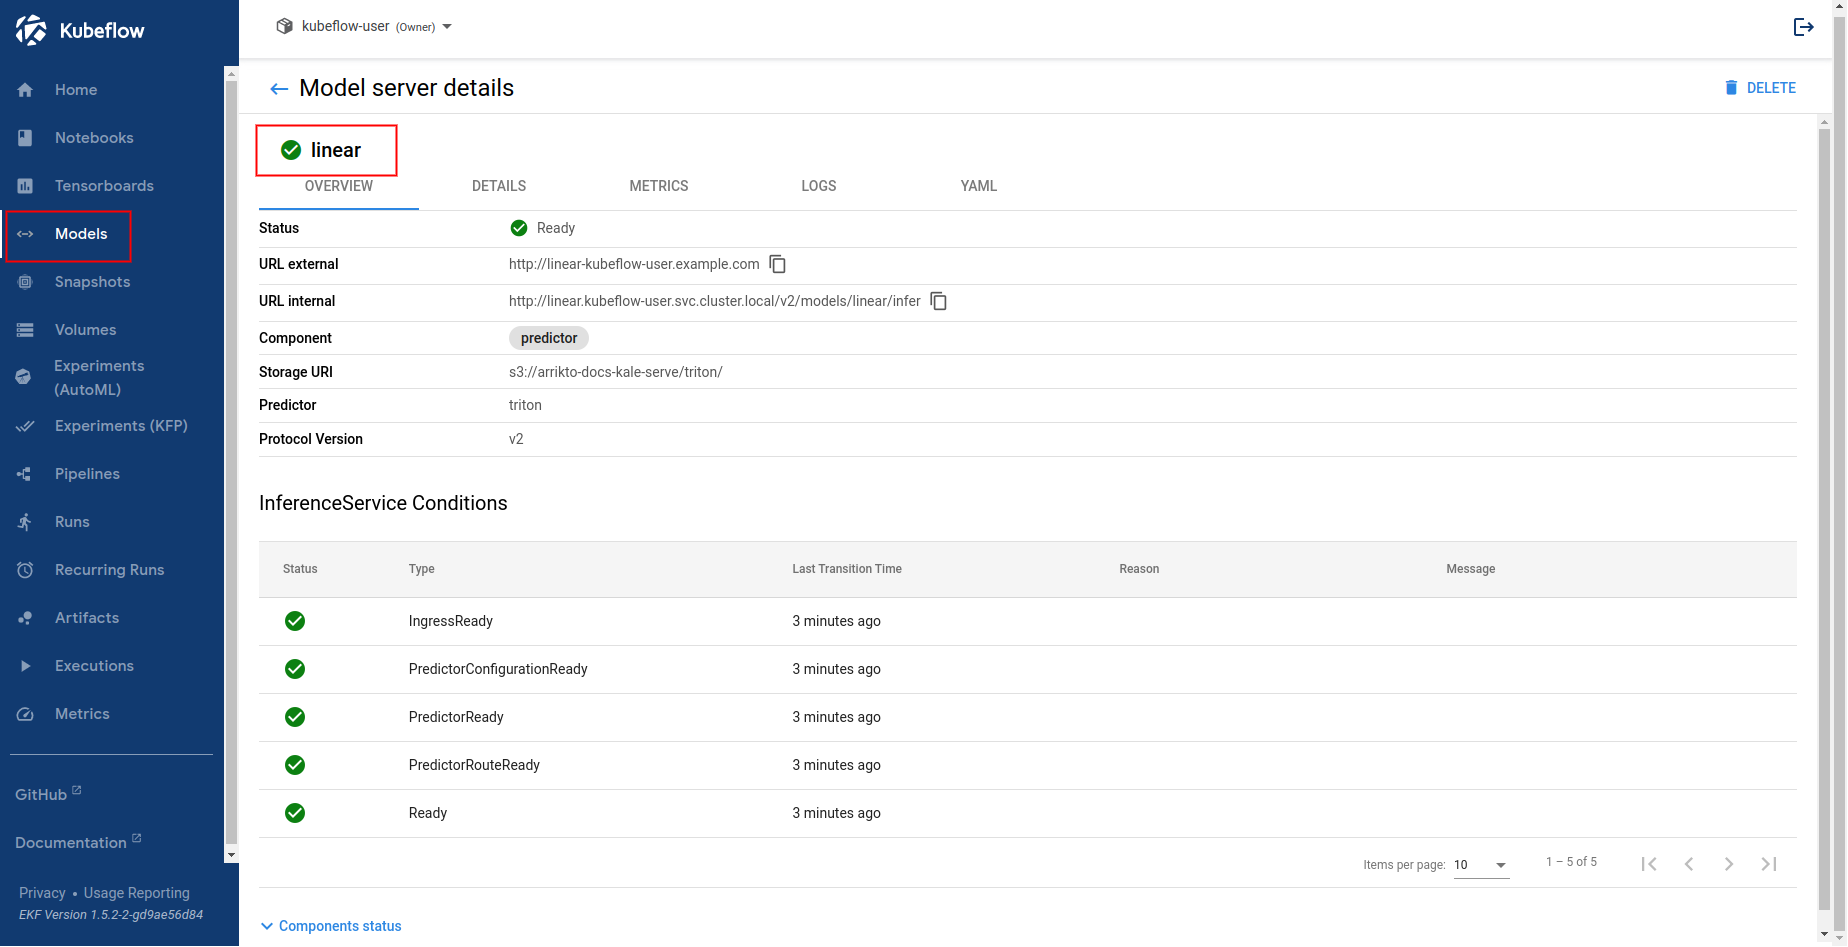
In the existing notebook, in a different code cell, initialize a Kale
Endpointobject using the name of theInferenceServiceyou retrieved in the previous step. Then, run the cell:Note
When initializing an
Endpoint, you can also pass the namespace of theInferenceService. For example, if your namespace ismy-namespace:If you do not provide one, Kale assumes the namespace of the notebook server. In our case it is
kubeflow-user.This is how your notebook cell will look like:

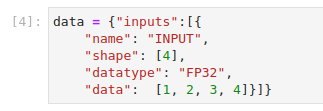
Convert the test example into JSON format. Copy and paste the following code into a new code cell, and run it:
This is how your notebook cell will look like:
Invoke the server to get predictions. Copy and paste the following snippet in a different code cell, and run it:
This is how your notebook cell will look like:
