
GitOps
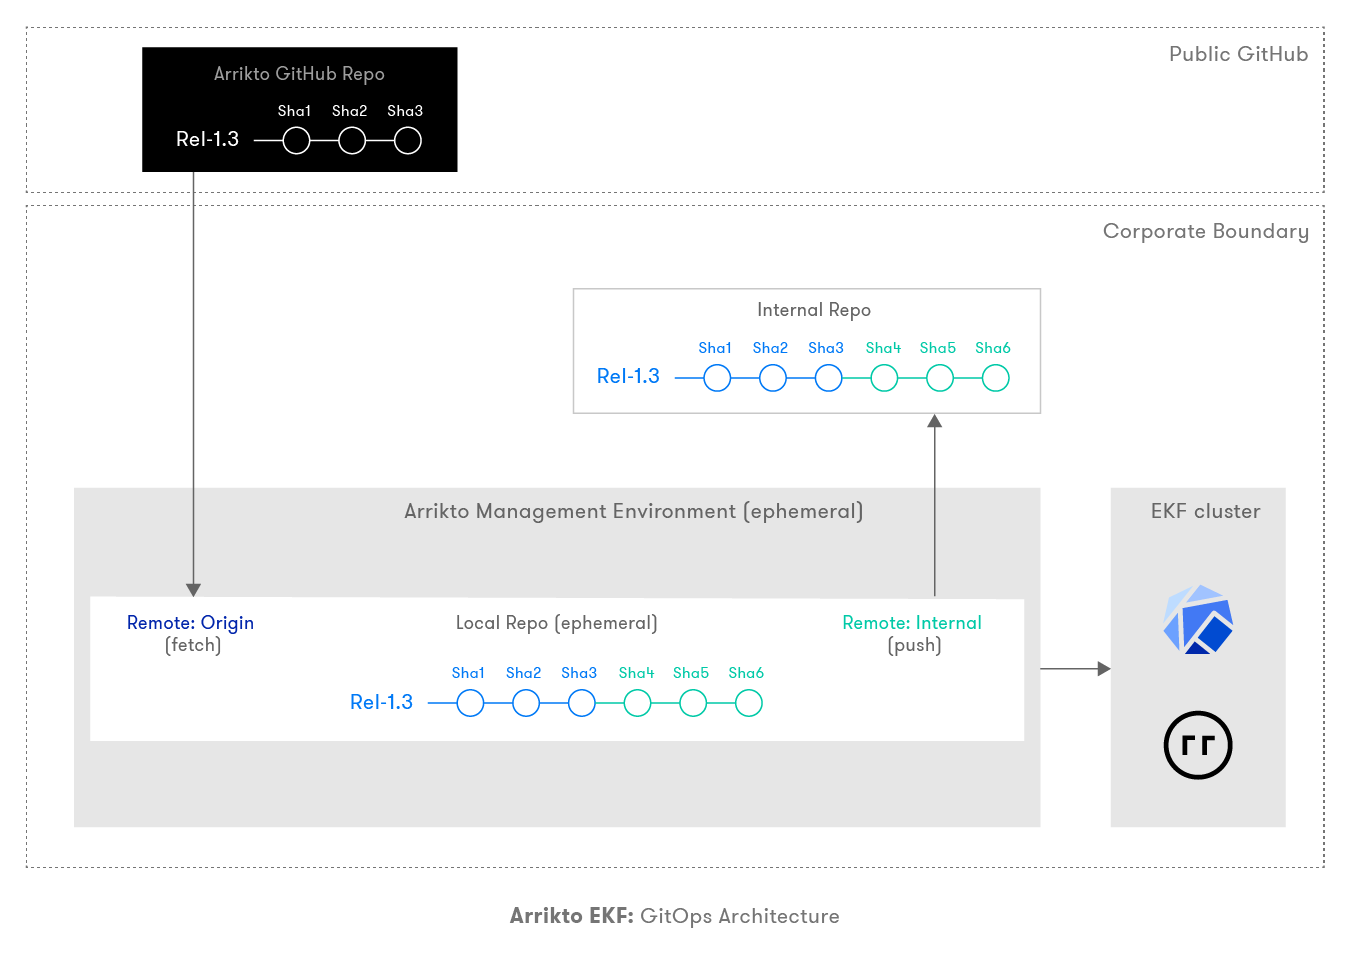
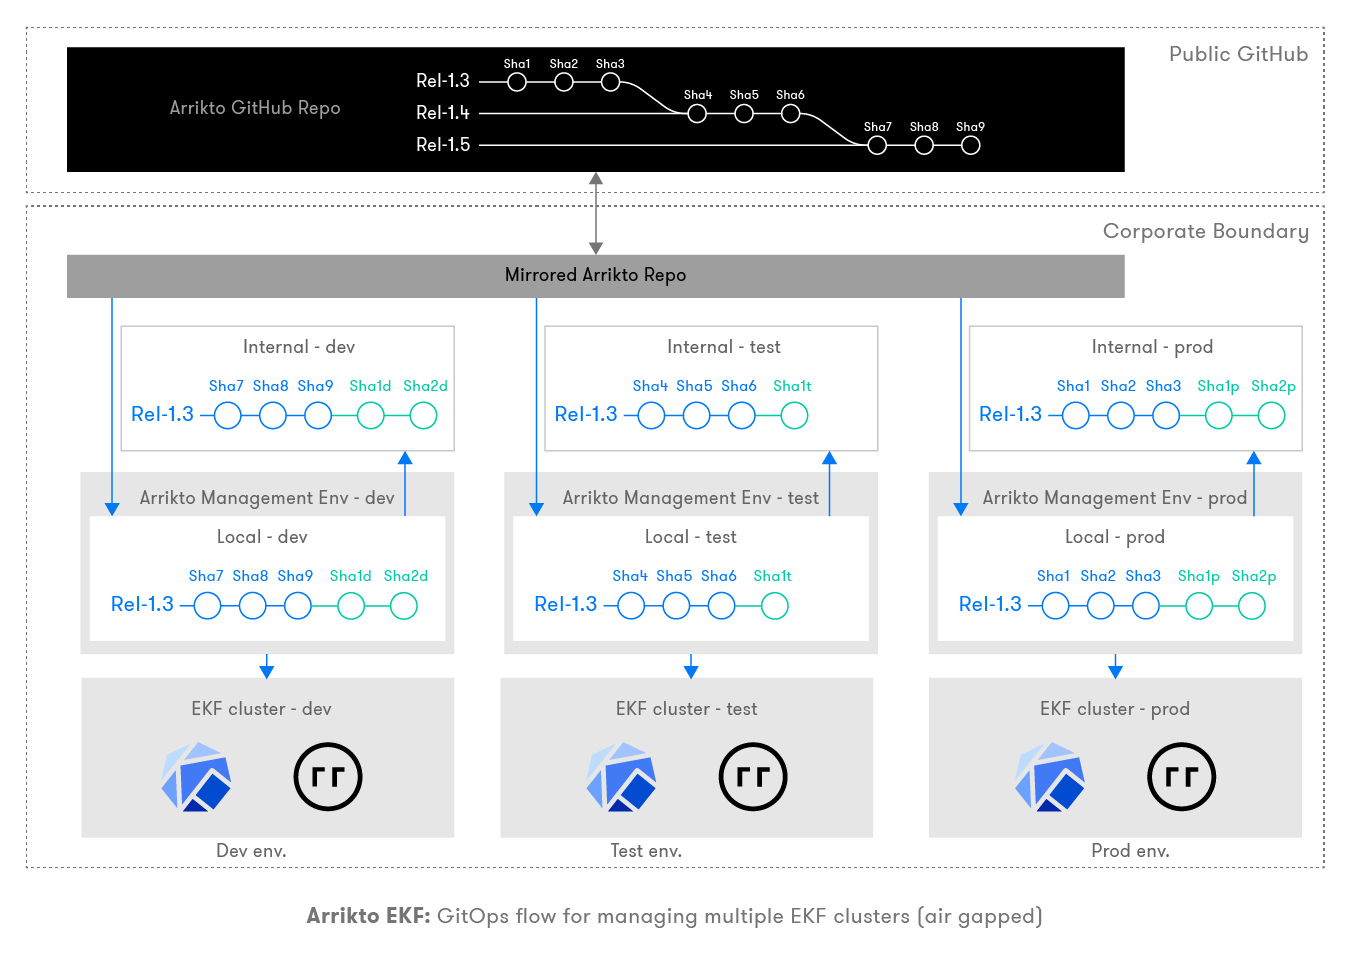
The first step to a successful GitOps-based Arrikto Enterprise Kubeflow deployment is the configuration of the relevant repositories, which are the foundation for all future GitOps-based activities. It is important to understand the configuration of the repositories before doing the EKF installation. After completing the GitOps setup, your environment will resemble the following:
Components of GitOps-Based Deployments
The primary components of GitOps-based Arrikto EKF deployments are as follows.
Primary repo
Arrikto public GitHub repository (Arrikto GitHub repo): This is Arrikto’s central GitHub repository which is available in the public domain but only accessible to authenticated licensed users. This is the single source of truth for all deployments across all Arrikto customers. Arrikto continues to push manifests of every new EKF release to this repository. This will serve as the origin for Git activity in your environment.
Air Gapped
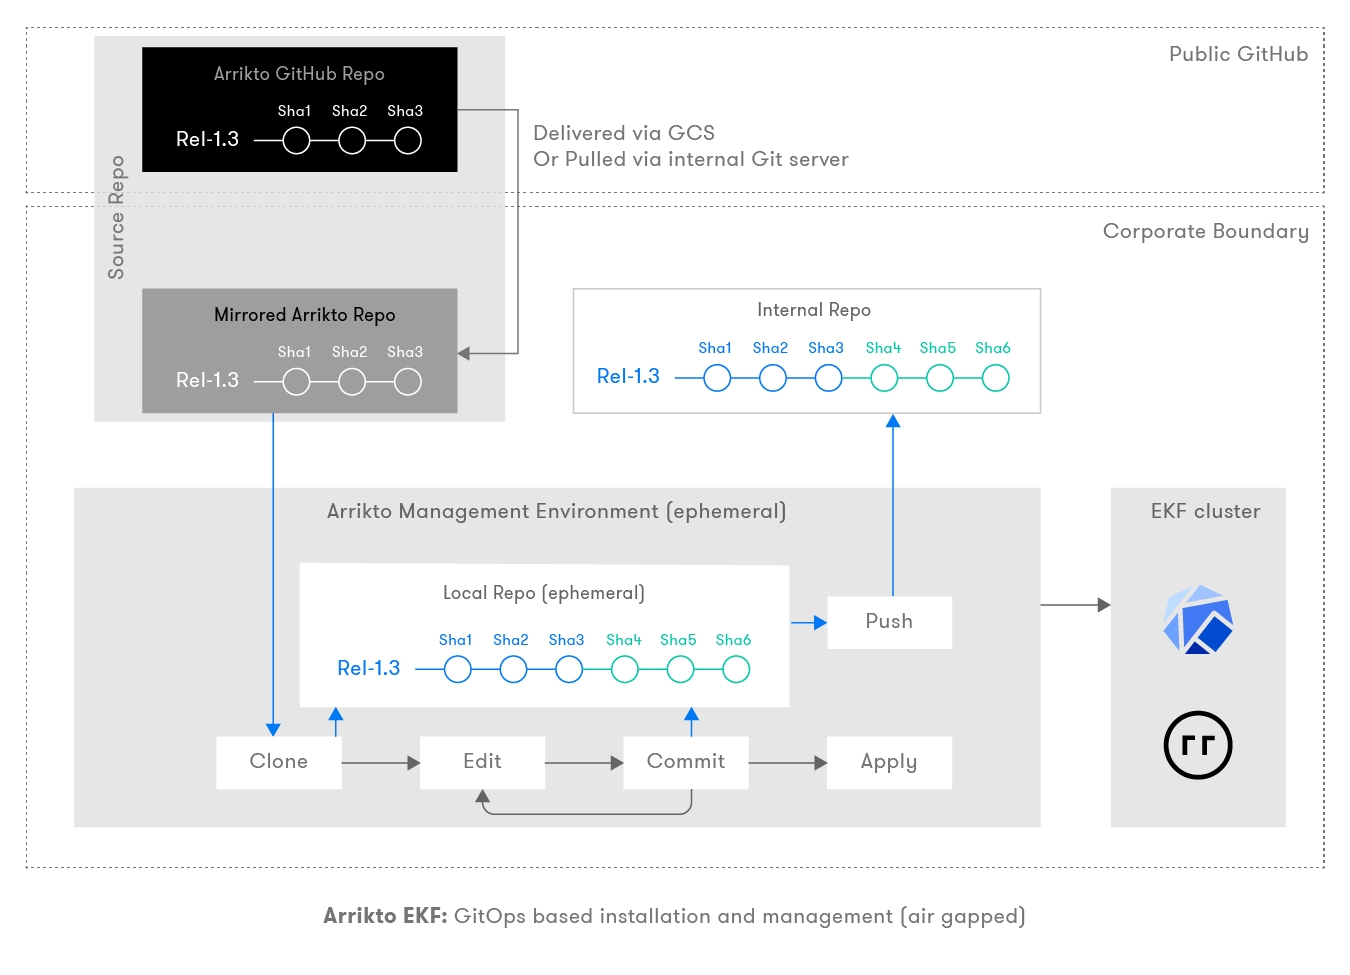
Corporate mirror of Arrikto GitHub repo (mirrored Arrikto repo): In an air-gapped environment where EKF clusters and Arrikto installer tools can not directly communicate with Arrikto’s public Github repo, enterprises can create a mirrored Git repository, which is a replica of Arrikto’s public Github repository. You can create this mirrored repository using various methods we will describe later. This will serve as the origin for Git activity in an air-gapped environment.
Internal repo: This is the Git repository internal to the corporation and is used as a source of record for the deployed EKF clusters configurations. All the work done in the local repo, inside the Arrikto Management Environment (which is ephemeral), needs to be pushed here for future management and upgrades of the EKF cluster.
Local repo: This is a Git repository that lives in the ephemeral Arrikto Management Environment, which is where the EKF installer executes. This acts as a local clone of the primary repo, which is used by the EKF admin to configure the state of the cluster in an edit, commit, and apply fashion. Once an EKF cluster is deployed, all the configuration specifics live in the form of various Git commits. The EKF admin needs to push these changes from the local repository to the internal Git repo to keep configurations on record and easily accessible for backups.
Repository Setup
Arrikto delivers Kustomize manifests for EKF installation via Arrikto GitHub repo.
We provide licensed users with SSH keys to authenticate to Arrikto GitHub repo.
Primary Git repository setup:
If users have access to GitHub from Arrikto’s installer, they can configure the installer with provided SSH keys to authenticate and clone from Arrikto’s public GitHub repository.
Air Gapped
In air-gapped environments where direct access to a GitHub repository is not available, the EKF admin needs to duplicate the Arrikto GitHub repo to an internal mirrored Arrikto repo. There are several ways to achieve this:
A tarball delivered via Google Cloud Services (GCS) can be used to populate an internal bare repository.
See also
Various Git servers allow you to connect and import/mirror from external Git repositories including GitHub. If your private Git instance server supports this functionality you can easily mirror Arrikto’s GitHub repository.
Use a jump host which can connect to both private internal Git server and external GitHub, to manually Git pull the manifests from Arrikto’s GitHub and push it to the internal repository.
Note
In either air-gapped or non air-gapped scenarios, users are not allowed to push changes back to the primary Git repository.
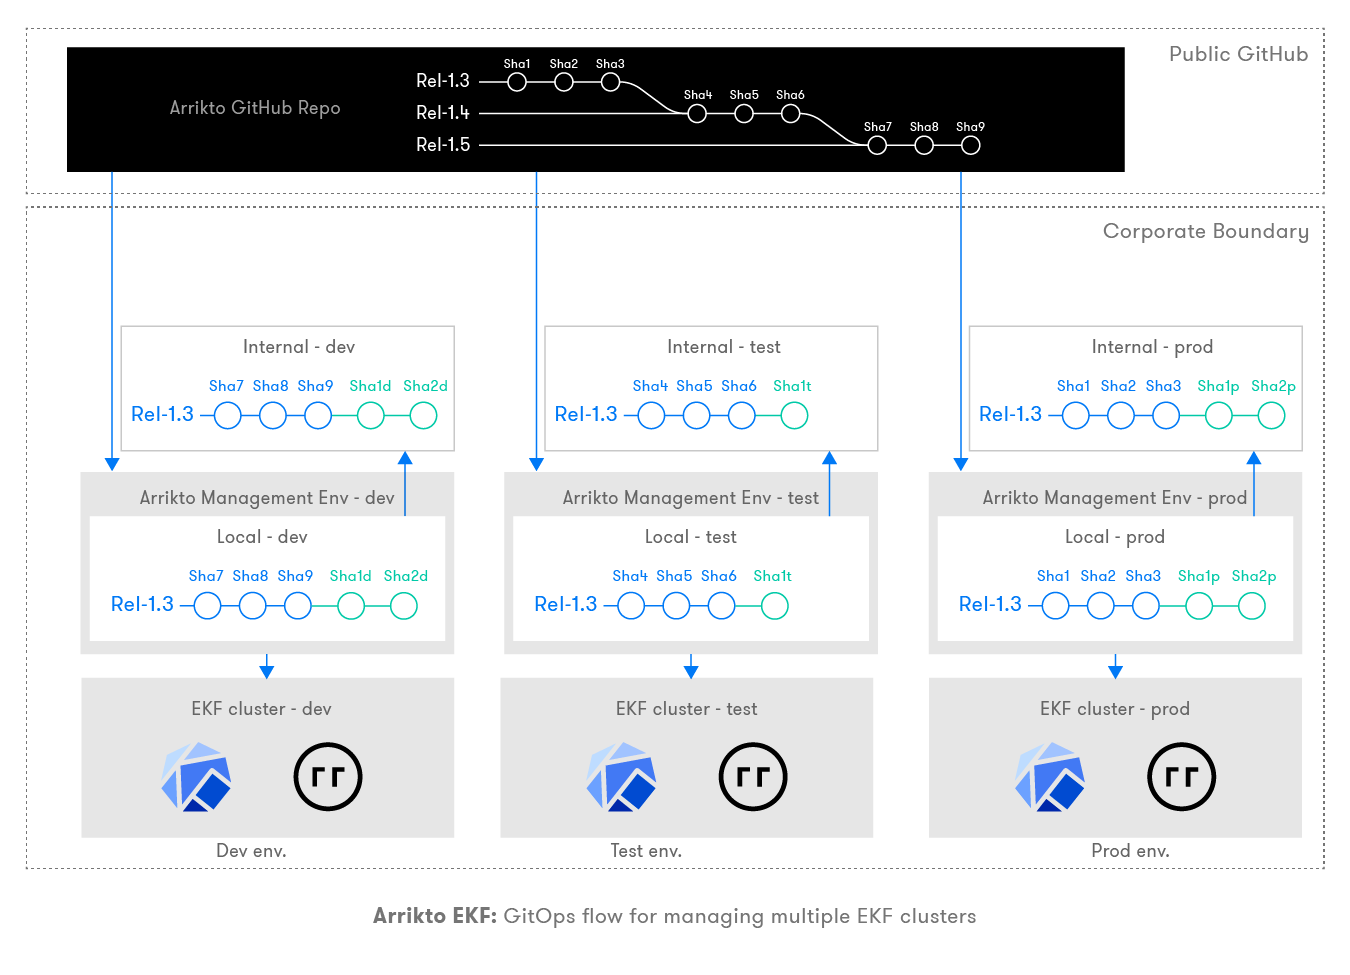
Internal repo: Any commits done at customer setup during the EKF installation need to persist in the internal repo. There should be an internal repo per cluster and will be referenced in later steps. All changes from the Arrikto Management Environment must be pushed to this internal repo so that the state of your cluster is safe and version controlled.
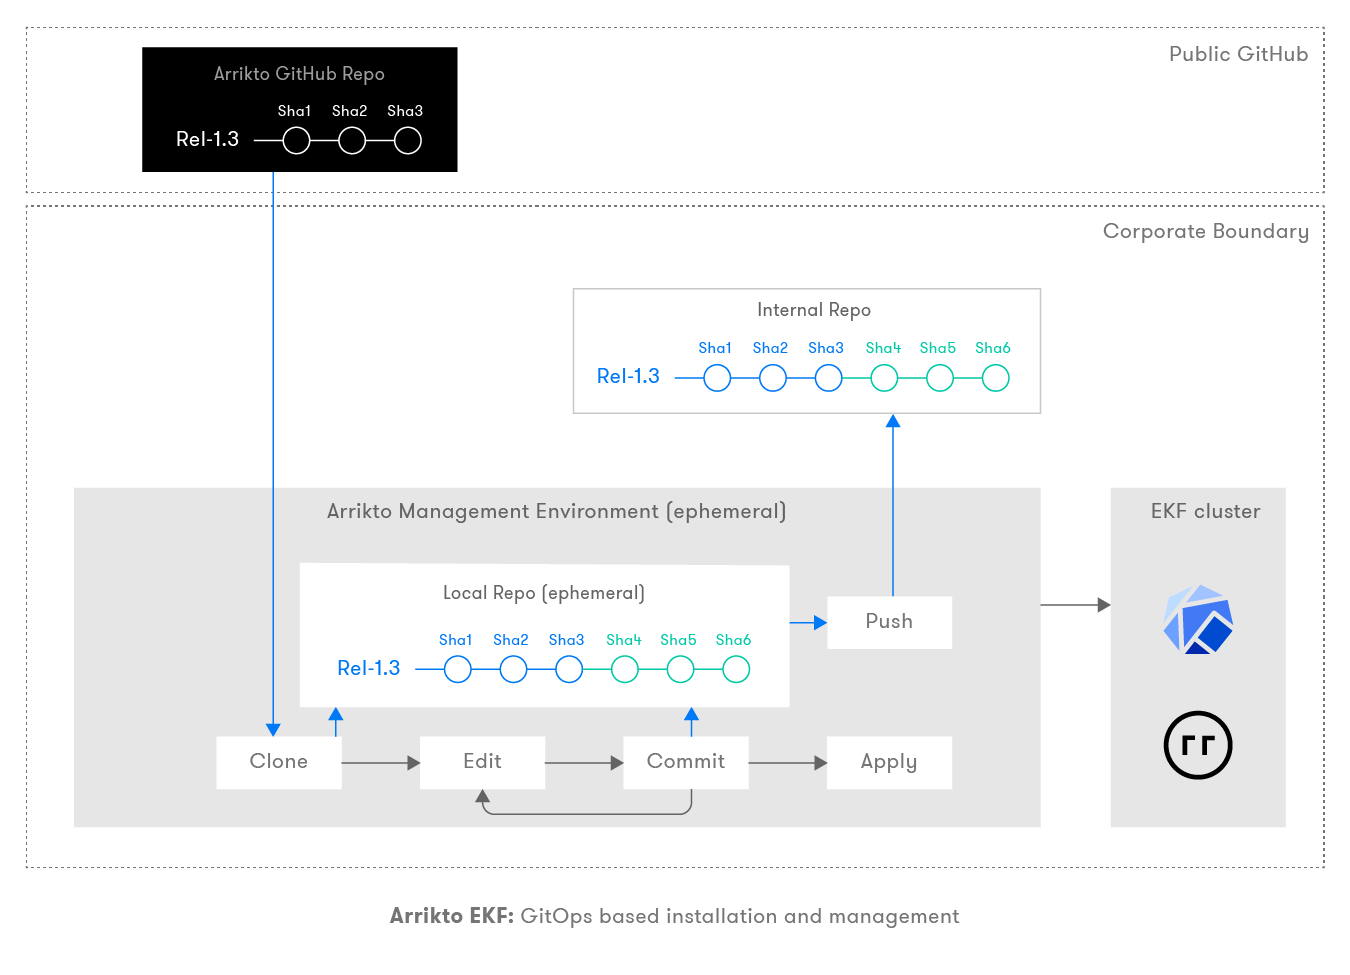
Arrikto Management Environment: This is a container, which includes all the tools required to install, configure, and manage EKF clusters. Arrikto’s EKF installer tool clones from the primary Git repo (either the Arrikto GitHub repo or the mirrored Arrikto repo if doing an air-gapped deployment) into an ephemeral Git repo residing within this container. You must configure this local repo to have a remote named
originpointing to either the Arrikto GitHub repo or the mirrored Arrikto repo if doing an air-gapped deployment. Installer tool will be fetching the latest manifest from this primary repo for the desired branch as published by Arrikto. Additionally, you must configure another remote namedinternalpointing to your internal repo. This internal repo will be used to push all the configuration changes related to the current cluster and save the state of the cluster for management and upgrades.Once you have set up the local repo inside the Arrikto Management Environment with the correct remotes for
originandinternal, you need to check out the release branch based on the release you are trying to install.
Upon completion, you will have a GitOps repository to facilitate your infrastructure as code deployments.
EKF GitOps Workflow
Once the local Git repository structure is ready (air-gapped or not) you are ready to proceed with editing manifests using Kustomize and pushing out infrastructure updates to your environments.
Naming Conventions
Consistent naming is critical for a successful GitOps workflow, please adhere to the below conventions:
| Remote | origin | Primary Git repository (either Arrikto GitHub repo or mirrored Arrikto repo) |
| Remote | internal | Customer’s internal GitOps repo |
| Branch | release-X.X | Release numbers must be the same as the branch being tracked |
Deploy EKF
Once you set up all the Git repositories, deploying EKF involves modifying the configurations via editing the manifests (kustomize files) in the local repository. In general, you will follow the below steps to adhere to GitOps best practices while customizing the configuration based on your needs before deploying an EKF cluster.
- Edit a manifest.
- Commit it to the local Git repository.
- Apply the manifest to the corresponding K8s cluster.
The above process can be repeated as many times as needed. Sometimes you might even do multiple commits before applying the committed changes to the K8s cluster. At the end of the installation, you will have multiple commits on top of what you fetched from the origin. These configuration changes (manifests) are versioned within Git, which makes it easy to roll back, audit, and upgrade Arrikto EKF. This process is well documented in the Arrikto installation document.
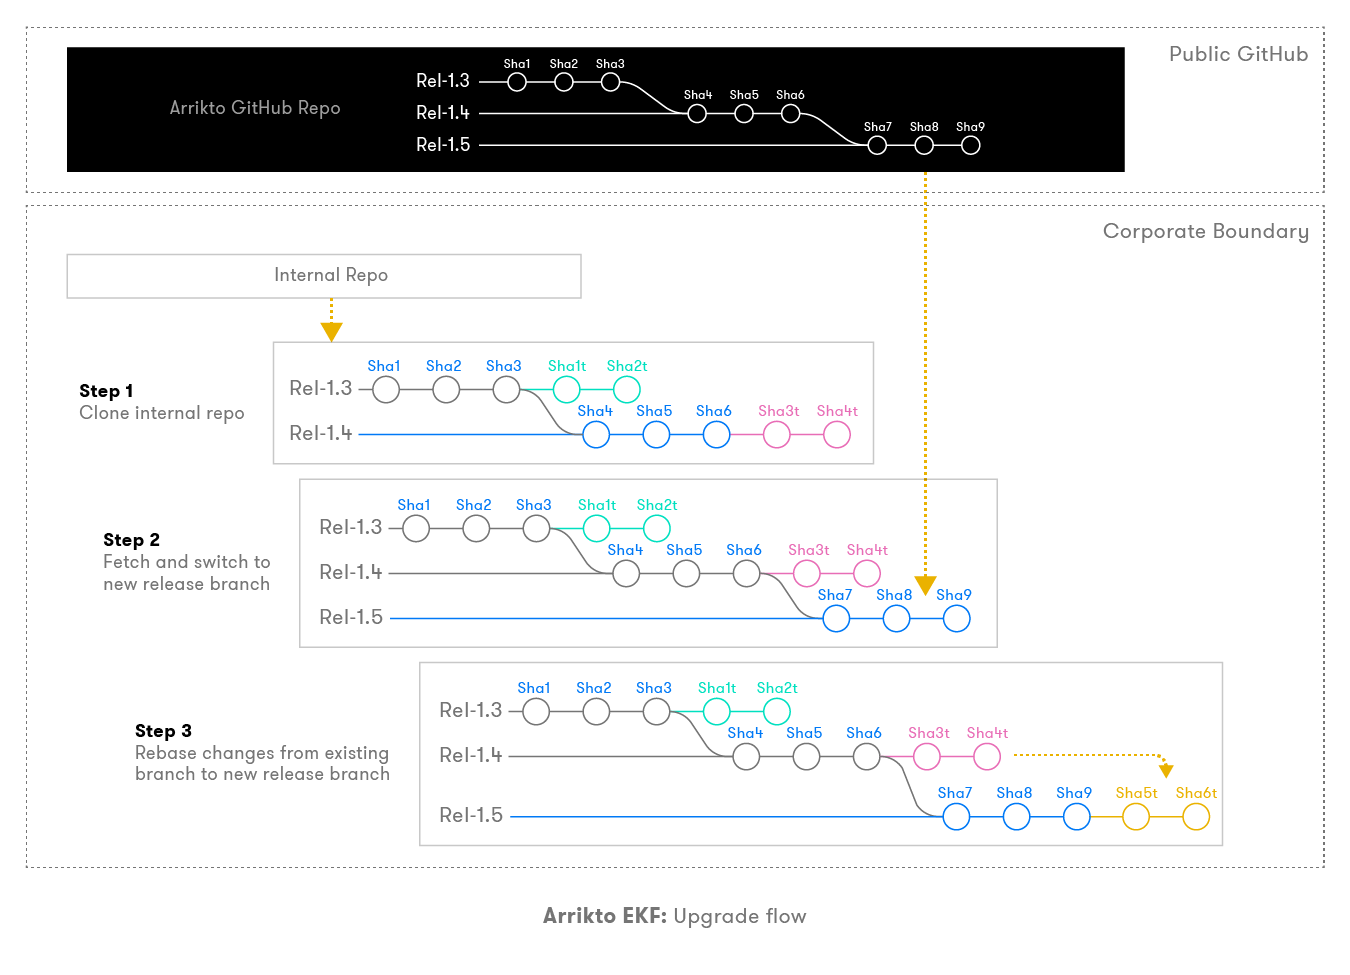
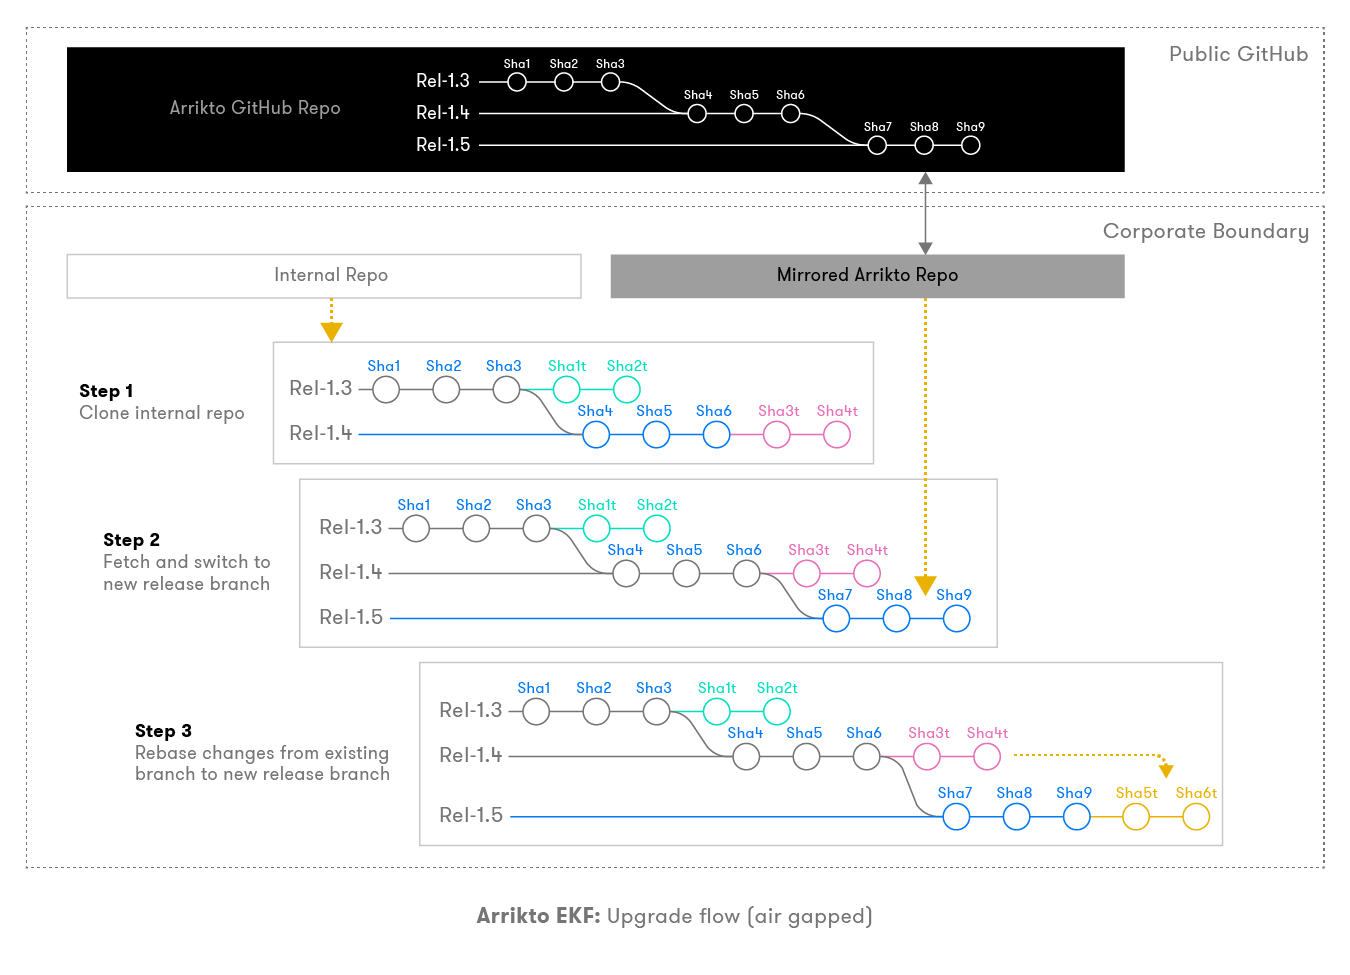
Air Gapped
For environments which are air-gapped you process will follow the flow below:
Save Cluster Configuration
All the changes done in the previous steps are committed to your local repo, inside your Arrikto Management Environment. For stability and reproducibility, we recommend you to push these commits to your internal repo for each cluster.
Air Gapped
For environments which are air-gapped you process will follow the flow below:
Marking Progress
As a best practice, Arrikto recommends marking the progress of work done on the EKF cluster configurations. We recommend using annotated tags when taking snapshots of the deployment state and add context about what happened during the deployment. For example, you can create a tag with
and add a message describing what happened during the deployment. This is very important if there is a need to roll back or understand changes that have been made or perform troubleshooting during an upgrade. While it may seem like noise, at the time everyone will appreciate additional detail if challenges arise in the future.
| Date | The date the deployment took place. |
| Local branch | The name of the local branch used to deploy the manifests. |
| Upstream branch | The name of the upstream branch used to deploy the manifests. |
| Upstream SHA | The SHA of the upstream manifests that were used. |
| Backup Branch | Where have these manifests been pushed for backup reasons. |
| Context | What happened during the deployment. |
As an example consider:
deploy/2021-09-04/release-1.1:
Local SHA: 123abc
Upstream SHA: 456def
Context: “We added Istio.”
You can retrieve the content of the tag:
You will iterate on this process through the various components you wish to modify. Once a cluster modification or update is successfully deployed you will want to commit all changes to the backup repo for preservation.
EKF Upgrade
By following the GitOps flow, the EKF upgrade process is very intuitive. To upgrade, you have to reapply the config commits in the internal repo to the new branch of the new release. There are two scenarios:
- If there are no changes in the structure of the manifests with the new release, then you can reapply previous commits on top of the new release branch seamlessly.
- If there are changes in the structure of the manifests, you cannot reapply changes on top of the new branch. In this case, Arrikto will be providing a release-specific migration tool, which will automatically transform the existing manifests to follow the new manifests.
To upgrade EKF and switch release channels, follow the general flow below and reference the procedural-based documentation here.
- Within your management environment verify your release branch, for example, release 1.2.
- Verify that the current branch has nothing to commit and the working tree is clean.
- Confirm that you are following the release channel for your current release, for example, release-1.2.
- Checkout and switch locally to the next release branch, for example, release-1.3
- Switch the branch you are following to the next release, for example, release-1.3
- Rebase your work on top of the new local release branch, for example, release-1.3
- Configure the local branch to track the new release channel.
- Apply changes using rok-deploy
Arrikto provides release-specific upgrade instructions with every release.
Air Gapped
For environments which are air-gapped you process will follow the flow below:
Deployment Best Practices
- Notify Arrikto and commit your desired changes so that we can support commits and rebase during upgrades. Work with Arrikto to document the procedure and ensure that there are no merge commits in the repo and make sure to use the release channel as the branch name.
- To ensure that your copy of our repo is consistent with our version of the truth, it is necessary to ensure that any external components are isolated from the Arrikto repos. Otherwise, it will become challenging to resolve any possible conflicts between the source repo and deployments.
- For application manifests that you deploy on top of the K8s cluster used by EKF, but are not an integral part of our offering yet, you can add them in a top-level directory of the repository. This way they will not clash with manifests provided by Arrikto and you can continue to track them independently. If in the future Arrikto starts supporting those applications as part of the product offering, we will provide a way to migrate them. Updates made outside of the GitOps repository will be overwritten when the repo gets applied.