
Run a Pipeline
In this section, we describe how to run a Kubeflow pipeline you created using the Kale JupyterLab extension and summarize how Kale organizes and executes pipeline steps.
How to Run a Pipeline
To run an annotated notebook as a Kubeflow pipeline (KFP) using Kale:
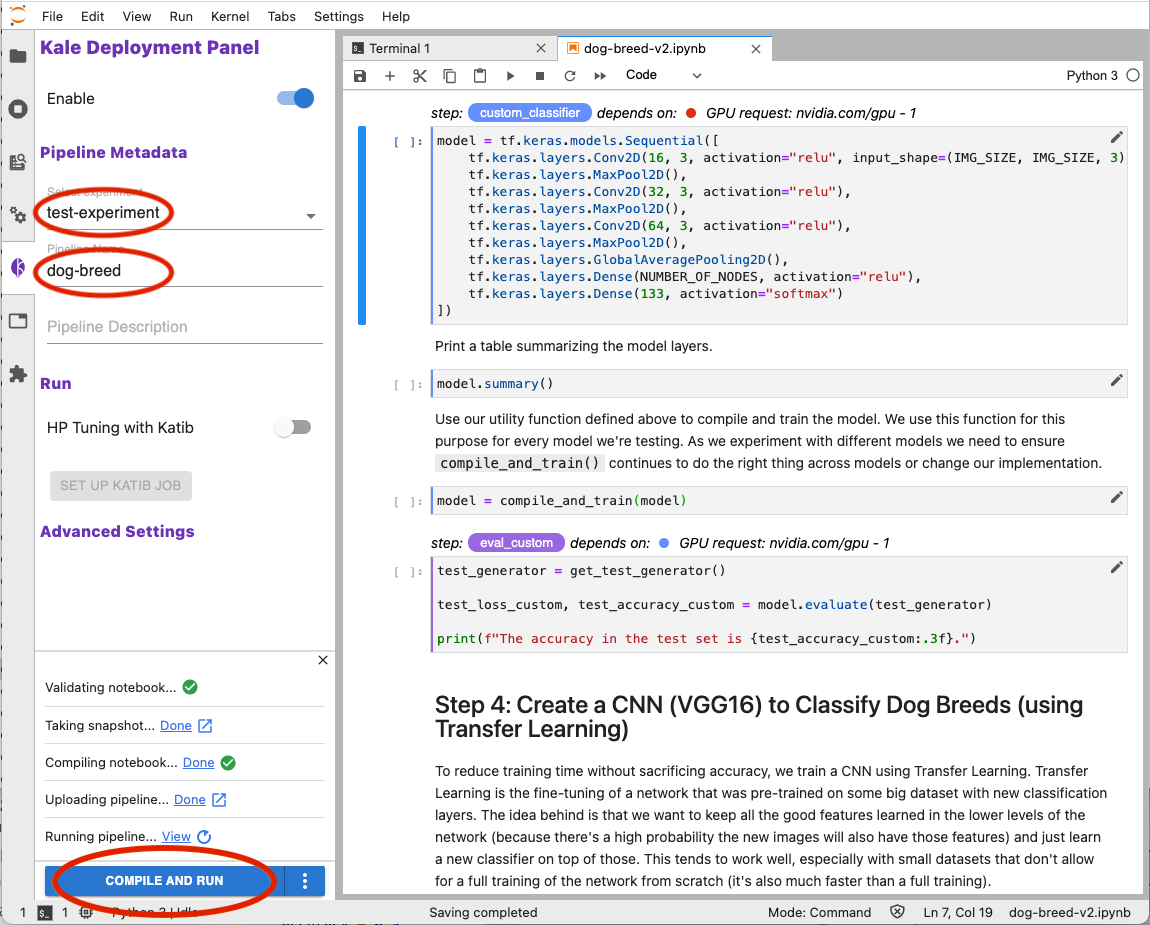
- Enter a name in the Select experiment field under the Pipeline Metadata heading or select an existing name from the pull-down menu. Kale enables you to group multiple pipeline runs together under the same experiment name. This simplifies comparisons across pipeline runs.
- Enter a name in the Pipeline Name field. Kale will use this name to identify your pipeline when producing output from a pipeline run, when creating snapshots, and for other purposes requiring an identifier.
- (Optional) Enter a description in the Pipeline Description field.
- Click the COMPILE AND RUN button at the bottom of the Kale Deployment Panel.
When you click COMPILE AND RUN Kale will do the following:
- Validate your notebook to ensure Kale can create a Kubeflow pipeline based on the annotations you have applied.
- Take a snapshot of your notebook environment workspace and data volumes. Kale uses the Rok data management layer to take snapshots.
- Compile your notebook into a Kubeflow pipeline represented as a YAML file.
- Upload your pipeline to the Kubernetes cluster.
- Run the pipeline.
Kale produces output in the Kale Deployment Panel as each of these tasks progresses. The links following the status message for each task enable you to explore the outcome of each task.
How Kale Creates a Pipeline Step
Kale containerizes pipeline steps for execution on your Kubernetes cluster. Therefore, each pipeline step runs in a separate execution environment.
To organize the code for a pipeline step, Kale creates a new notebook with cells containing the code that the step needs in order to run. The cells Kale creates are as follows, in order:
- (Optional) A cell to set the Pipeline Parameters if such a cell was annotated in your notebook.
- A cell with the code necessary to unmarshal the data values the step depends on.
- One or more cells for all code annotated as Imports in the order specified in your notebook.
- One or more cells for all code annotated as Functions in the order specified in your notebook.
- One or more cells for the code annotated as Pipeline Step for the specific step Kale is creating.
- A cell to marshal the data values that other steps depend on.
- (Optional) A Pipeline Metrics cell if such a cell was annotated in your notebook.
Kale configures each pipeline step to execute in an iPython environment. This simulates the way your code would execute if you were simply running your Jupyter notebook.
How Kale Marshals Data
Kale will marshal values assigned in Imports and Functions cells so that the data is available in the execution environment for each step of a machine learning pipeline. Changes made to these values are marshalled from step to step as inputs and outputs throughout a pipeline run.
Kale implements backends so that it can marshal objects that cannot be easily stringified. For example, Kale implements specialized backends for PyTorch and scikit-learn objects. Kale’s marshalling backend framework is expandable to accommodate new object types as they are needed.