
Create AKS Cluster
This section will guide you through creating an AKS cluster using the Azure portal or the Azure CLI. Once done you will have an AKS cluster with:
- Kubernetes 1.19.
- Azure CNI network configuration.
- The control plane spread on all availability zones.
- A system node pool with two nodes that will host critical system pods.
- Pod Identities enabled.
See also
What You'll Need
- (Optional) Access to the Azure portal.
- A configured management environment.
- A configured cloud environment.
- An existing resource group.
Procedure
Switch to your management environment and specify the cluster name to use:
root@rok-tools:~# export AKS_CLUSTER=arrikto-cluster
Create the AKS cluster. Choose one of the following options, based on how your are managing your Azure resources.
Sign in to the Azure portal.
Click Create a resource and search for Kubernetes service.
Click Create.
For Project details:
- Set Subscription to your desired subscription.
- Set Resource group to arrikto, the resource group you previously created.
For Cluster details:
- Set Kubernetes cluster name to arrikto-cluster.
- Set Region to your desired region.
- Set Availability zones to Zones 1,2,3. Select all zones to ensure your cluster operates reliably. Your control plane and the primary node pool will be spread across these zones.
- Set Kubernetes version to the latest 1.19 available, 1.19.11.
For Primary node pool:
- Set Node size to Standard DS2 v2 (the default one).
- Set Node count to 2.
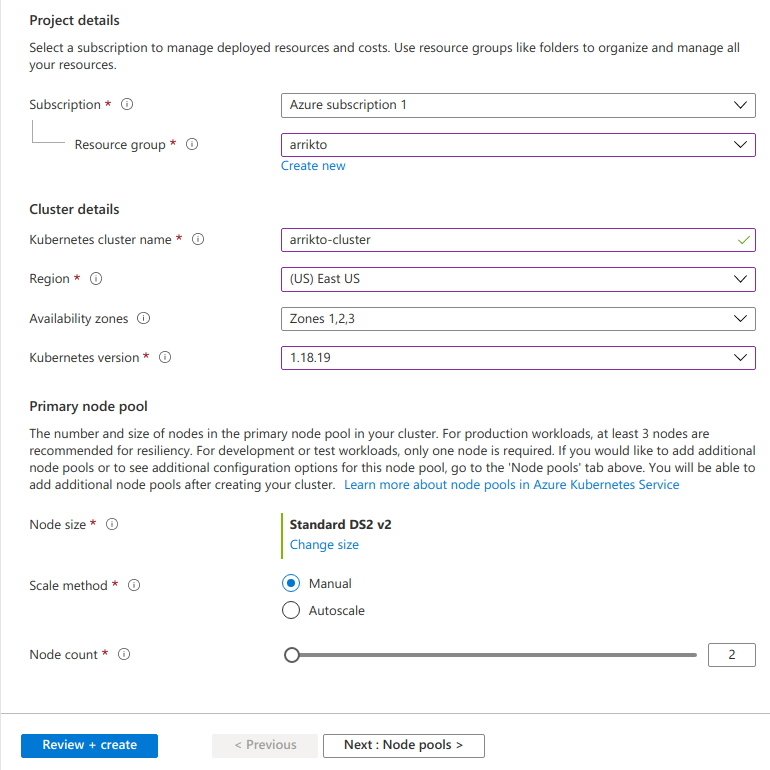
Click Next: Node pools.
Keep the default options.
Click Next: Authentication.
Keep the default options.
Click Next: Networking.
Set Network configuration to Azure CNI, since Kubenet does not support Pod identities. Keep the defaults for the remaining options.
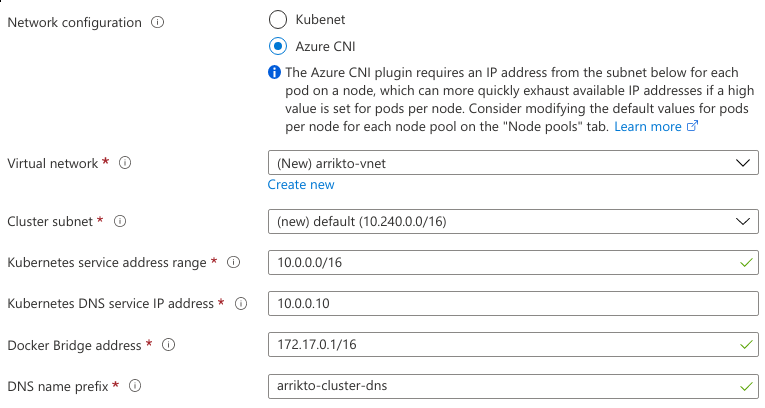
Click Review + create and Create.
Wait for Azure to provision your cluster.
Specify the number of nodes:
root@rok-tools:~# export SNP_NODE_COUNT=2
Specify the VM size:
root@rok-tools:~# export SNP_VM_SIZE=Standard_DS2_v2
Specify the zones in which to deploy the cluster:
root@rok-tools:~# export SNP_ZONES="1 2 3"
Create the AKS cluster:
root@rok-tools:~# az aks create \
>    --subscription ${SUBSCRIPTION_ID?} \
>    --resource-group ${AZ_RESOURCE_GROUP?} \
>    --name ${AKS_CLUSTER?} \
>    --location ${AZURE_DEFAULTS_LOCATION?} \
>    --zones ${SNP_ZONES?} \
>    --kubernetes-version 1.19.11 \
>    --node-vm-size ${SNP_VM_SIZE?} \
>    --node-count ${SNP_NODE_COUNT?} \
>    --nodepool-name agentpool \
>    --network-plugin azure \
>    --generate-ssh-keys
{
  ...
  "agentPoolProfiles": [
    {
      "availabilityZones": [
        "1",
        "2",
        "3"
      ],
      "count": 2,
      "enableAutoScaling": null,
      ...
      "mode": "System",
      "name": "agentpool",
      ...
      "orchestratorVersion": "1.19.11",
      ...
      "osSku": "Ubuntu",
      "osType": "Linux",
      ...
      "provisioningState": "Succeeded",
      ...
      "vmSize": "Standard_DS2_v2",
      ...
    }
  ],
  ...
  "kubernetesVersion": "1.19.11",
  ...
  "location": "eastus",
  ...
  "name": "arrikto-cluster",
  "networkProfile": {
    ...
    "networkMode": null,
    "networkPlugin": "azure",
    ...
  },
  ...
  "provisioningState": "Succeeded",
  "resourceGroup": "arrikto",
  "servicePrincipalProfile": {
    "clientId": "msi",
    "secret": null
  },
  ...
}
Verify
From inside your management environment, ensure that the AKS cluster exists and that ProvisioningState is Succeeded:
root@rok-tools:~# az aks show -o table \
>    --resource-group ${AZ_RESOURCE_GROUP?} \
>    --name ${AKS_CLUSTER?}
Name             Location    ResourceGroup    KubernetesVersion    ProvisioningState    Fqdn
---------------  ----------  ---------------  -------------------  -------------------  -------------------------------------------------
arrikto-cluster  eastus      arrikto          1.19.11              Succeeded            arrikto-cluster-dns-e5ab9967.hcp.eastus.azmk8s.io
Ensure that managed identities are enabled in your AKS cluster by verifying that the Service Principal's clientId is equal to msi:
root@rok-tools:~# az aks show \
>    --resource-group ${AZ_RESOURCE_GROUP?} \
>    --name ${AKS_CLUSTER?} \
>    --query "servicePrincipalProfile"
{
  "clientId": "msi"
}
Troubleshooting
The client ID is a UUID
If the output of the above command looks like the following:
{
  "clientId": "baee89f9-59f1-4c37-8147-221a373fcf7a"
}
then managed identities are disabled in your AKS cluster. You can enable managed identities in your AKS cluster as follows:
Update your AKS cluster (i.e., the control plane and addon Pods) to work with managed identities:
root@rok-tools:~# az aks update \
>    --resource-group ${AZ_RESOURCE_GROUP?} \
>    --name ${AKS_CLUSTER?} \
>    --enable-managed-identity
Upgrade your system node pool so that the kubelet component uses the managed identity:
root@rok-tools:~# az aks nodepool upgrade \
>    --resource-group ${AZ_RESOURCE_GROUP?} \
>    --cluster-name ${AKS_CLUSTER?} \
>    --name agentpool \
>    --node-image-only
Ensure that Azure CNI is enabled in the cluster by verifying that the network plugin name is equal to azure:
root@rok-tools:~# az aks show \
>    --name ${AKS_CLUSTER?} \
>    --resource-group ${AZ_RESOURCE_GROUP?} \
>    --query networkProfile.networkPlugin
"azure"
Summary
You have successfully created your AKS cluster.