
Add Disks for Rok to Use
This section will guide you through adding the necessary local storage for Rok to use. Rok can run on any instance type, as long as there are disks available for it to use.
- For instance types that have local NVMe disks, for example, Lsv2-series, Rok will automatically find and use all of them.
- For instance types without local NVMe disks, for example, DSv2-series, you will need one or more extra data disks of the exact same size. Rok will use all extra data disks attached at LUNs 60-63.
Note
If the instances of your user node pool already have the necessary storage attached (local NVMe disks), you may proceed to the Verify section.
What You'll Need
- (Optional) Access to the Azure portal.
- A configured management environment.
- An existing AKS cluster.
- An existing user node pool.
Procedure
In case you have used a node size without local NMVe disks, you will have to attach an extra data disk for Rok to use as local storage. To do that, you have to modify the underlying Virtual machine scale set for your node pool.
Choose one of the following options, based on how you are managing your Azure resources.
Sign it to the Azure portal.
Search for Kubernetes services and select the AKS cluster you previously created, arrikto-cluster.
On the sidebar, under Settings, click Properties.
Search for Infrastructure resource group, and click MC_arrikto_arrikto-cluster_eastus.
Filter for vmss to find the underlying Virtual machine scale sets.

Click the VMSS for your user node pool, aks-workers-XXXXXXXX-vmss.
On the sidebar, under Settings, click Disks.
Click Create and attach a new disk.
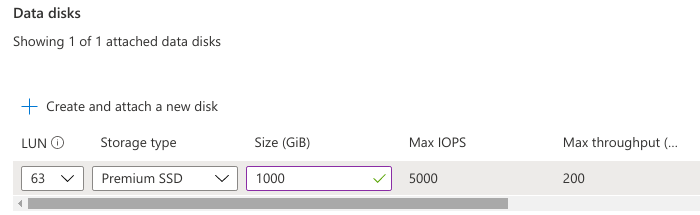
For Data disk:
- Set LUN to 63 (the last one available)
- Set Storage type to Premium SSD (the default one)
- Set Size to 1000 GiB.
Click Save and wait for this change to complete.
On the sidebar, under Settings, click Instances.
Select all instances of the VMSS, and click Upgrade. Azure will hotplug the data disk without restarting/recreating the instances.
Find the node resource group of your AKS cluster:
root@rok-tools:~# export AZ_NODE_RESOURCE_GROUP=$(az aks show -o tsv \
>     --resource-group ${AZ_RESOURCE_GROUP?} \
>     --name ${AKS_CLUSTER?} \
>     --query nodeResourceGroup)
Find the VMSS in the node resource group that corresponds to the workers node pool:
root@rok-tools:~# export VMSS_NAME=$(az resource list -o tsv \
>     --resource-type Microsoft.Compute/virtualMachineScaleSets \
>     --resource-group ${AZ_NODE_RESOURCE_GROUP?} \
>     --query "[?tags.poolName=='workers'].name")
Output the VMSS name and ensure it is not empty:
root@rok-tools:~# echo ${VMSS_NAME?}
aks-workers-42403446-vmss
Troubleshooting
The VMSS name is empty
If you have recently created a workers node pool but the underlying VMSS is not shown by the above command, then this is probably due to the eventual consistency model of the Azure Resource Manager. Because of this, the Azure Resource Manager may report a VMSS 15-30 minutes after its creation.
In this case, you can either wait for the Azure Resource Manager to update its cache, or, if you have access to the Azure Portal, you can find the VMSS in the Azure Portal UI using the instructions in the
Azure Portaltab.Attach disks to the VMSS:
root@rok-tools:~# az vmss disk attach \
>    --vmss-name ${VMSS_NAME?} \
>    --resource-group ${AZ_NODE_RESOURCE_GROUP?} \
>    --size-gb 1000 \
>    --lun 63 \
>    --sku Premium_LRS
{
  "location": "eastus",
  "name": "aks-workers-42403446-vmss",
  ...
  "resourceGroup": "MC_arrikto_arrikto-cluster_eastus",
  ...
  "sku": {
    "capacity": 1,
    "name": "Standard_DS2_v2",
    "tier": "Standard"
  },
  ...
  "virtualMachineProfile": {
  ...
    "storageProfile": {
      "dataDisks": [
        {
          "caching": "None",
          "createOption": "Empty",
          "diskIopsReadWrite": null,
          "diskMBpsReadWrite": null,
          "diskSizeGb": 1000,
          "lun": 63,
          "managedDisk": {
            "diskEncryptionSet": null,
            "storageAccountType": "Premium_LRS"
          },
          "name": null,
          "writeAcceleratorEnabled": null
        }
      ],
      ...
    }
  },
  ...
}
Find the list of nodes in the VMSS:
root@rok-tools:~# az vmss list-instances \
>    --name ${VMSS_NAME?} \
>    --resource-group ${AZ_NODE_RESOURCE_GROUP?} \
>    -o table
InstanceId    LatestModelApplied    Location    ModelDefinitionApplied    Name                         ProvisioningState    ResourceGroup                      VmId
------------  --------------------  ----------  ------------------------  ---------------------------  -------------------  ---------------------------------  ------------------------------------
0             False                 eastus      VirtualMachineScaleSet    aks-workers-42403446-vmss_0  Succeeded            MC_arrikto_arrikto-cluster_eastus  8c215254-eb13-4ed2-9249-12cfb3a04592
Attach disks to the nodes. To do that, repeat the steps below for each one of the nodes in the list.
Pick a node from the list:
root@rok-tools:~# export INSTANCE_ID=<INSTANCE_ID>
Perform a manual upgrade of the node. This will result in a disk getting attached to the node:
root@rok-tools:~# az vmss update-instances \
>    --name ${VMSS_NAME?} \
>    --resource-group ${AZ_NODE_RESOURCE_GROUP?} \
>    --instance-ids ${INSTANCE_ID?}
Go back to step a, and repeat the steps for the remaining nodes.
Verify
Find the node resource group of your AKS cluster:
root@rok-tools:~# export AZ_NODE_RESOURCE_GROUP=$(az aks show -o tsv \
>     --resource-group ${AZ_RESOURCE_GROUP?} \
>     --name ${AKS_CLUSTER?} \
>     --query nodeResourceGroup)
Find the VMSS in the node resource group that corresponds to the workers node pool:
root@rok-tools:~# export VMSS_NAME=$(az resource list -o tsv \
>     --resource-type Microsoft.Compute/virtualMachineScaleSets \
>     --resource-group ${AZ_NODE_RESOURCE_GROUP?} \
>     --query "[?tags.poolName=='workers'].name")
Inspect all instances of the VMSS to find their VM size and their Data Disk LUN(s) (if any). Verify that Column2 is a Storage Optimized VM size or that Column3 reports LUN(s) 60-63:
root@rok-tools:~# az vmss list-instances -o table \
>    --resource-group ${AZ_NODE_RESOURCE_GROUP?} \
>    --name ${VMSS_NAME?} \
>    --query '[].[name,sku.name,storageProfile.dataDisks[].lun]'
Column1                      Column2         Column3
---------------------------  --------------- -------
aks-workers-42403446-vmss_0  Standard_L8s_v2 []
aks-workers-42403446-vmss_1  Standard_L8s_v2 []
aks-workers-42403446-vmss_1  Standard_DS2_v2 [63]
Summary
You have successfully added local storage on your user node pool for Rok to use.
What's Next
The next step is to enable Pod identities in your AKS cluster.