
Create User Node Pool
In this section you will add a user node pool to your AKS cluster. This will host all the Arrikto EKF workloads.
What You'll Need
- (Optional) Access to the Azure portal.
- A management environment with Azure CLI configured.
- An existing AKS cluster.
- Access to the AKS cluster.
Procedure
Create the user node pool. Choose one of the following options, based on how you are managing your Azure resources.
Sign in to the Azure portal.
Search for Kubernetes services and select the AKS cluster you previously created, arrikto-cluster.
On the sidebar, under Settings, click Node pools.
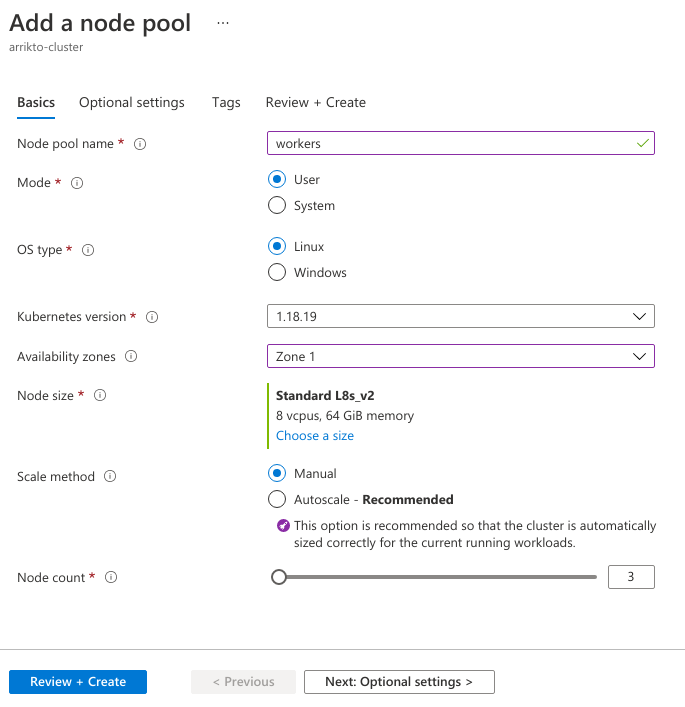
Click Add node pool and:
- Set Node pool name to workers.
- Set Mode to User.
- Set OS type to Linux.
- Set Availabitity zones to Zone 1.
- Set Node size to L8s_v2 (8 vCPU, 64G RAM, 1.92T NVMe).
- Set Scale method to Manual.
- Set Node count to 3.
Troubleshooting
You have insufficient quotas to create the node pool
If the quotas in your Azure subscription are not sufficient to create the node pool, the Azure portal will display the following error:

In this case, you need to either delete other resources to free up quota, or follow these steps to create a support request to increase them. Note however that it can take a few hours until Azure increases your quotas.
- Go to the Help and Support page of the Azure portal.
- Click Create a support request.
- Set Issue type to Service and subscription limits (quotas).
- Set Subscription to your Azure subscription.
- Set Quota type to Compute-VM (cores-vCPUs) subscription limit increases.
- Click Next.
- Click Enter details.
- Set Deployment model to Resource Manager.
- Set Locations to the location of your AKS cluster.
- Set Quotas to LSv2 Series.
- Set New vCPU Limit to 64.
- Click Save and continue.
- Set Preferred contact method to your preferred contact method.
- Click Next.
- Click Create.
Lsv2-series instances are not available in the selected zone
It is possible that
Lsv2-seriesinstances are not available in zone 1 of your desired region.In this case, the Azure Portal UI will display the following error message when selecting the node size:
This size is currently unavailable for these availability zones: 1
To fix this, select one of the other available zones and attempt to set Node size again. If they are not available in any of the available zones then make sure you have followed the instructions in section Set Up Cloud Environment for Azure to select a region that supports instances of this type.
Click Next: Optional settings.
Set Max pods per node to 250, which is the maximum value supported for Azure CNI.
Click Review + create and then Create.
Wait for Azure to provision your user node pool.
Specify the number of nodes:
root@rok-tools:~# export UNP_NODE_COUNT=3
Specify the VM size:
root@rok-tools:~# export UNP_VM_SIZE=standard_l8s_v2
Specify the zones in which to deploy the node pool:
root@rok-tools:~# export UNP_ZONES=1
Create the user node pool:
root@rok-tools:~# az aks nodepool add \
>    --cluster-name ${AKS_CLUSTER?} \
>    --name workers \
>    --resource-group ${AZ_RESOURCE_GROUP?} \
>    --mode User \
>    --os-type Linux \
>    --zones ${UNP_ZONES?} \
>    --node-vm-size ${UNP_VM_SIZE?} \
>    --node-count ${UNP_NODE_COUNT?} \
>    --max-pods 250
{
  "agentPoolType": "VirtualMachineScaleSets",
  "availabilityZones": [
    "1"
  ],
  "count": 3,
  "enableAutoScaling": null,
  ...
  "maxPods": 250,
  ...
  "mode": "User",
  "name": "workers",
  ...
  "osSku": "Ubuntu",
  "osType": "Linux",
  ...
  "provisioningState": "Succeeded",
  ...
  "resourceGroup": "arrikto",
  ...
  "vmSize": "standard_l8s_v2",
  ...
}
Troubleshooting
You have insufficient quotas to create the node pool
If the quotas in your Azure subscription are not sufficient to create the node pool, the Azure CLI will emit the following error message:
Operation failed with status: 'Bad Request'. Details: Provisioning of resource(s) for Agent Pool workers failed. Error: {
  "code": "InvalidTemplateDeployment",
  "message": "The template deployment '86887354-3280-4df4-a018-97206bd9ae9c' is not valid according to the validation procedure. The tracking id is '30ef5968-b026-441e-a271-829fe95a4266'. See inner errors for details.",
  "details": [
   {
    "code": "QuotaExceeded",
    "message": "Operation could not be completed as it results in exceeding approved Total Regional Cores quota. Additional details - Deployment Model: Resource Manager, Location: eastus, Current Limit: 10, Current Usage: 4, Additional Required: 24, (Minimum) New Limit Required: 28. Submit a request for Quota increase at https://aka.ms/ProdportalCRP/?#create/Microsoft.Support/Parameters/%7B%22subId%22:%225361f4ed-77bb-4e35-b223-f875d30df1a9%22,%22pesId%22:%2206bfd9d3-516b-d5c6-5802-169c800dec89%22,%22supportTopicId%22:%22e12e3d1d-7fa0-af33-c6d0-3c50df9658a3%22%7D by specifying parameters listed in the 'Details' section for deployment to succeed. Please read more about quota limits at https://docs.microsoft.com/en-us/azure/azure-supportability/regional-quota-requests."
   }
  ]
 }
In this case, you need to either delete other resources to free up quota, or follow these steps to create a support request to increase them. Note however that it can take a few hours until Azure increases your quotas.
- Go to the Help and Support page of the Azure portal.
- Click Create a support request.
- Set Issue type to Service and subscription limits (quotas).
- Set Subscription to your Azure subscription.
- Set Quota type to Compute-VM (cores-vCPUs) subscription limit increases.
- Click Next.
- Click Enter details.
- Set Deployment model to Resource Manager.
- Set Locations to the location of your AKS cluster.
- Set Quotas to LSv2 Series.
- Set New vCPU Limit to 64.
- Click Save and continue.
- Set Preferred contact method to your preferred contact method.
- Click Next.
- Click Create.
Lsv2-series instances are not available in the selected zone
It is possible that
Lsv2-seriesinstances are not available in zone 1 of your desired region.In this case, the Azure CLI will emit the following error message:
Deployment failed. Correlation ID: 0331f0a1-4093-494f-b668-2fd1e8a42a9c. Code="OverconstrainedZonalAllocationRequest" Message="Allocation failed. VM(s) with the following constraints cannot be allocated, because the condition is too restrictive. Please remove some constraints and try again. Constraints applied are:\n - Availability Zone\n - Networking Constraints (such as Accelerated Networking or IPv6)\n - VM Size\n"
To fix this, select one of the other available zones and run the command again. If they are not available in any of the available zones then make sure you have followed the instructions in section Set Up Cloud Environment for Azure to select a region that supports instances of this type.
From inside your management environment, taint the system node pool so that application pods are scheduled only on the newly created user node pool:
root@rok-tools:~# kubectl taint node \
>    -l kubernetes.azure.com/mode=system \
>    CriticalAddonsOnly=true:NoSchedule
node/aks-agentpool-42403446-vmss000000 tainted
node/aks-agentpool-42403446-vmss000001 tainted
Verify
Verify that the node pool exists and ProvisioningState is succeeded:
root@rok-tools:~# az aks nodepool list -o table \
>    --resource-group ${AZ_RESOURCE_GROUP} \
>    --cluster-name ${AKS_CLUSTER}
Name       OsType    VmSize           Count    MaxPods    ProvisioningState    Mode
---------  --------  ---------------  -------  ---------  -------------------  ------
agentpool  Linux     Standard_DS2_v2  2        110        Succeeded            System
workers    Linux     Standard_L8s_v2  3        250        Succeeded            User
Verify that the nodes show up in the Kubernetes cluster:
root@rok-tools:~# kubectl get nodes
NAME                                STATUS   ROLES   AGE     VERSION
aks-agentpool-42403446-vmss000000   Ready    agent   34m     v1.19.11
aks-agentpool-42403446-vmss000001   Ready    agent   34m     v1.19.11
aks-workers-42403446-vmss000000     Ready    agent   9m45s   v1.19.11
aks-workers-42403446-vmss000001     Ready    agent   9m45s   v1.19.11
aks-workers-42403446-vmss000002     Ready    agent   9m45s   v1.19.11
Summary
You have successfully created a user node pool to host the Arrikto EKF workloads.
What's Next
The next step is to verify that your nodes have the necessary local storage for Rok to use.